

If you’re looking to take screenshots on Windows 10 or 11, you won’t be able to just press ‘PrtSc, Alt+PrtSc’ or ‘Win+PrtSc.’ These methods don’t work on web pages, documents, and Word files. And that doesn’t mean it’s impossible.
With the release of Windows 10/11, Microsoft introduced a new feature that allows users to take scrolling screenshots. This means that you can now capture an entire webpage or document without having to manually stitch together multiple images. In this article, we’ll show you how to take a scrolling screenshot on Windows 10/11 using the built-in Snipping Tool.
To start, open the Snipping Tool and click on the New button. This will allow you to select the type of screenshot you want to take. For a scrolling screenshot, choose the Scrolling Window option. Once you’ve done this, your screen will dim and you can click and drag to select the area you want to capture. When you’re finished, release the mouse button and your screenshot will be taken.
If you want to save your screenshot, click on the File menu and choose Save As. You can then choose where you want to save your image and what format you’d like it in. And that’s all there is to take a scrolling screenshot on Windows 10/11!
Windows 10 is, in some ways, better than Windows 7 when it comes to screen capturing. There are a few different ways you can capture your screen–by pressing Ctrl + PRTSC or Fn + PRTSC on a keyboard, clicking the Screen Sketch icon that is always available in the notification tray, or opening the powerful Snipping Tool.
However, with all those already great options for capturing screens and windows, you can only capture either what’s visible within your browser window or the whole screen.
Taking a scrolling screenshot in Windows 10/11 is easy! All you need is the built-in Snipping Tool. Here’s how to use it:
1. Open the Snipping Tool by searching for it in the Start Menu.
2. In the Snipping Tool, click on the “New” button.
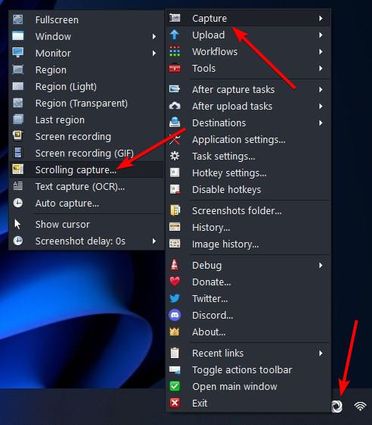
3. A small menu will appear. Click on the “Scroll Capture” option.
4. The screen will dim and you can click and drag to select the area you want to capture.
5. Once you’re done, release the mouse button and your screenshot will be taken!
Capturing scrolling screenshot Windows on a webpage
When it comes to taking a screenshot on various web pages, there are various ways to capture the page content-
Capture a scrolling screenshot in Microsoft Edge:
Press the Windows Key and Print Screen keys on your keyboard to take a full-size screenshot, which captures the whole desktop.
Navigate to where you want to save the screenshot and press Enter.
- Click the three-dot menu icon – this is at the top right corner of Edge.
- Age of empires 2.0 download. If a picture is worth 1000 words, then imagine what a video must be worth.
- After you click “Capture full page,” it will automatically select scrolling capture.
- Click the three dots at the top right, and you can choose to edit, save, or share the image right then.
